Welcome to an overview of the HoudiniEsq Outlook plugin. You may skip to the following:
Note – The HoudiniEsq Office Plugins are for Windows only. ALSO, if you use the Outlook plugin do not use the internal HoudiniEsq email client as well. Having your email sync through the plugin and the HoudiniEsq email client is redundant and it will cause link and syncing problems. We recommend using either the plugin or the internal email client.
Backup Outlook Data
This Add-in may change both your HoudiniEsq and Outlook data, we strongly recommend making a backup of your Outlook data (especially for your contact and appointments) before you install and use it for the first time. Read how to so here.
Download & Installation
This Add-in works with Outlook 2007 and above.
To download the plugin click this link:
Please note: if you have Office 365, you must install Outlook to your local PC. We do not support the cloud-only application currently.
- Installation should only take seconds. It will take longer if you don’t have Visual Studio tools for Microsoft Office Runtime installed previously.
- Setup is required for each user in your firm if they want to use HoudiniEsq toolbar on Outlook.
Setup
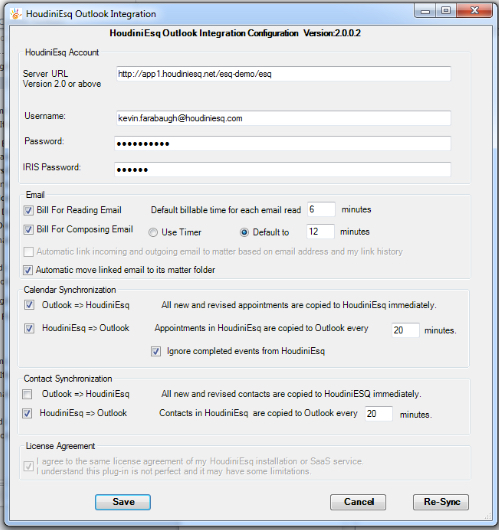
HoudiniEsq Account
- In this section, please enter your server URL.
- Your URL is the one you use to login to your HoudiniEsq account. It should be in the form of http://(hostname)/(instance-name)/esq/If you are on premise, this will most likely be http://localhost/houdini/esq/
- Please enter your username and password that you use to login.
- The IRIS password is the one you setup when you installed.
- IMPORTANT NOTE: If you are using HoudiniEsq SaaS, you will connect to the following URL: https://houdiniesq.net/. Then fill in the Firm name as directed.
You can link Email to matters with a single click. You can also bill your time for reading and composing Email.
- Bill for Reading Email
- Check this checkbox if you bill your client for reading an incoming Email. You can change the original amount of time automatically assigned to reading an email from the default, which is 6 minutes.
- Bill for Composing Email
- Check this checkbox if you bill your client for composing an Email. You can set a default time for each Email you compose or you can use the timer. You can always use the timer even if you set the default time.
Automatic Linking (disabled, no longer available)
Calendar Synchronization
HoudiniEsq offers 2-way calendar synchronization between Outlook and HoudiniEsq.
- Outlook => HoudiniEsq
- This is real time synchronization and it is turned on by default. The moment you enter an appointment in Outlook you will see the exact same appointment in HoudiniEsq Calendar immediately.
- HoudiniEsq => Outlook
- Check this option if you want to synchronize your appointments from HoudiniEsq to Outlook. This synchronization is not real time. By default it is on every 20 minutes interval. If you create a new appointment in HoudiniEsq calendar, you will see it in your Outlook calendar in about 20 minutes. For Outlook performance reasons, the minimum time you can set is 10 minutes. Please note that Events will be synchronized from the HoudiniEsq calendar for whoever is selected as the primary Staff only.
Contact Synchronization
HoudiniEsq offers 2-way contact synchronization between Outlook and HoudiniEsq. In some instances, Contact synchronization between Outlook and HoudiniEsq are turned off by default on purpose. This is normally the case for in-house counsels and requested by your system administrators.
- Outlook => HoudiniEsq
- This is real time synchronization and it is turned on by default. The moment you enter a new contact in Outlook you will see the exact same contact in HoudiniEsq Contact immediately. By default, all contacts are under Client category.
- HoudiniEsq => Outlook
- Check this option if you want to synchronize your contacts from HoudiniEsq to Outlook. This synchronization is not real time. By default it’s on every 20 minutes interval. If you create a new contact in HoudiniEsq, you will see it in your Outlook Contact in about 20 minutes. For Outlook performance reasons, the minimum time you can set is 10 minutes.
HoudiniEsq only syncs the difference so it is very fast. If you want to do completely sync again, click Setup, and then click “Re-Sync” button to sync every contact and every appointment.
License Agreement
- You must agree to the license agreement. A registration Email will be sent to our license server automatically.
- You will get the following message if setup process is successful.
- Connection is successful. Setup is completed.
Synchronization
- The system will ask you to do an initial synchronization. This will allow your contacts and appointments in Outlook and HoudiniEsq to be synchronized and it may take some time depending on the amount of data you have.
- This is one time task and you have to complete it before you can synchronize your contacts and appointments on a regular basis. If you have both Outlook running at home and in the office, please DO NOT select “Copy my appointment/contacts to HoudiniEsq” on more than one machine. If you do, it will create duplicate contacts for you if you have the same contact on two different computers.
We strongly recommend you to use the default settings for the initial synchronization.
Initial Synchronization Options
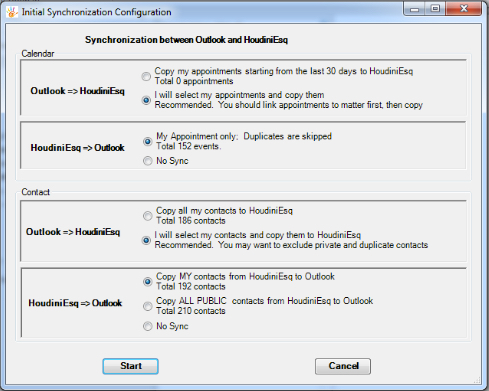
Calendar
- Outlook => HoudiniEsq
- By default, no existing appointments on your Outlook calendar will be copied to HoudiniEsq calendar. This is because appointments should be linked to a matter. You can link your existing appointments with a matter by clicking the Link button on the toolbar.
- Of course you can select the other option and have all your existing appointments synchronized to HoudiniEsq. In this case, none of these appointments will be linked with any matter.
- HoudiniEsq => Outlook
- By default, all your existing appointments in Houdini ESQ will be synchronized to Outlook. If you don’t want this, you can select the “No Sync” option.
Contact (In some instance, the contact synchronization is turned off on purpose, this is normally requested by your system administrators)
- Outlook => HoudiniEsq
- By default, no existing contacts on your Outlook will be copied to HoudiniEsq. This is because some contacts may be private and you may not want other users to see them. You can select multiple contacts and click “Upload Contacts” button on toolbar to synchronize. This gives you full control over your contacts data.
- Of course you can select the other option and have all your contacts synchronized to HoudiniEsq. In this case, every user in your HoudiniEsq system will see the contacts.
- HoudiniEsq => Outlook
- By default, all your contacts including your private contacts in HoudiniEsq will be synchronized to Outlook. With this option, contacts created by other users will not be synchronized to your Outlook.
- Select the other option if you want all public contacts in HoudiniEsq to be synchronized to your Outlook. With this option, your private contacts in HoudiniEsq will not be copied over.
- If you don’t want your HoudiniEsq contacts to be synchronized to Outlook, you can select the “No Sync” option.
HoudiniEsq Toolbar & Linking Email to Matters
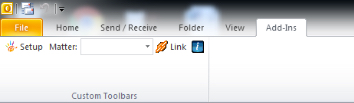
- After successful installation, you will see the HoudiniEsq toolbar for Outlook. Click the Setup button to modify your setting information if needed. You can change your settings at any time.
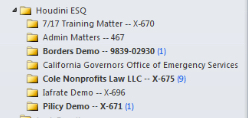
- To find a matter, start typing in the matter box and hit the Enter key to search; matched matters will be returned in the list.
- To link Email to a matter, select the matter, and select one or more Email and then click Link button on the toolbar. All linked Email will be automatically moved to its matter folder under HoudiniEsq folder. You can also drag Emails to the matter folder to link.
- To link appointments to a matter, select the matter, and select one or more appointments and then click Link button on the toolbar.
- To upload contacts, select one or more contacts, and then click the “Upload Contacts” button on the toolbar.
- While you are reading an Email, if the Email is related to a matter, you can search for the matter and then click the “Link” button to link the Email to matter. If you made a mistake, you can click the “Unlink” button.
- For every outgoing Email, if it is related to a matter, you can search for the matter and select the matter to link it. If you bill for composing Email task, please read the following section.
Bill for Composing Email
- If you want to bill for the time composing the Email, check the Billable checkbox, the timer will start automatically.

-
- Click start and then stop, and billed minutes will be automatically entered for you based on the timer, of course you can always overwrite it. Billable time defaults to 6 minutes (0.1 hour) increments.
- If you selected “Timer” at the setup time for your composing Email activities, you will have to start the timer in order for a time entry to be created. If you don’t start the timer, the default time is 0 and no time entry will be created. If you selected to use “Default” as the setup time for your composing Email tasks, a billable timer entry will be created regardless of the timer.
- If you normally bill for Email. You can turn on “Bill for Composing Email” in your settings with a default time duration. Each time you compose an email and link it to a matter, a billable event with the default time duration will be auto created for you in HoudiniEsq.
Attach Files
You can attach a file to a new email directly from the HoudiniEsq IRIS database by entering a Matter name, then simply clicking the “Attach File” button.
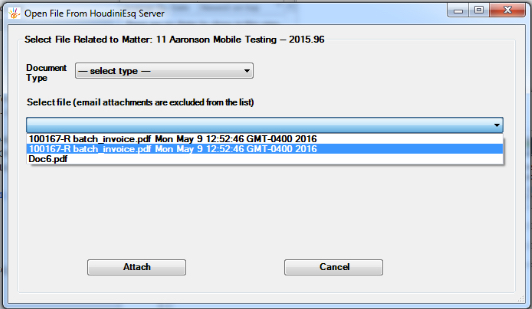
This will open up the Attach File form. Select the file you wish to attach from the current list of linked documents, and specify the Revision if necessary. Then click Attach. You can also use the Document Type dropdown to filter your results by type.
Using Email Templates
If you have email templates defined in HoudiniEsq, you can generate email for the selected matter by selecting the template in the Template drop down. You should review the generated email before clicking the Send button.
Outlook Calendar and Appointments
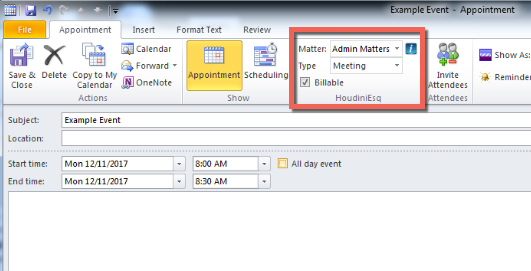
If you have turned on the “Outlook=>HoudiniEsq” calendar synchronization in the settings, all appointments you create, modify or delete in Outlook will be immediately synchronized to HoudiniEsq calendar. If you have that option turned off, when you create an appointment and link it to a matter, only the linked appointment will be synchronized to HoudiniEsq. To link an appointment to a matter, you should search and select the matter, select the type of appointment (you can customize event types in HoudiniEsq). Optionally, if the appointment is billable, check the Billable checkbox.
- Meeting Invitations (with some limitations)
- Meetings you create in Outlook will be synchronized to HoudiniEsq accurately if all meeting attendees use this Add-in with Outlook. If some attendees don’t use this Outlook add-in, you should manually add them to the event as meeting attendees in HoudiniEsq.
- Recurring Appointments (with some limitations)
- When you create a recurring appointment, all occurrences are also created in HoudiniEsq. Updates to the series are supported except for the meeting start time, but updates to a particular occurrence of the series is not supported. Delete of the entire series is supported, but delete to a particular occurrence is not supported. As of now, we also don’t support exceptions of recurring events.
If you have turned on the “Outlook=>HoudiniEsq” contact synchronization in the settings, all contacts you create, modify or delete in Outlook will be immediately synchronized to HoudiniEsq contact.
If you have that option turned off, you can manually select a list of contacts from Outlook and click the Upload button on HoudiniEsq toolbar to synchronize the selected contacts to HoudiniEsq.
HoudiniEsq Fields for Calendar and Contacts View
Note –Any Contacts that you do not want synchronized by the Outlook plugin, you should mark as Private in Outlook. Otherwise, the Outlook plugin will import every Contact record in your Outlook list into HoudiniEsq.
- HoudiniEsq Add-in creates its own fields that you can add to the Email, Calendar and Contacts view. This will enable you to see clearly what items have been synchronized with HoudiniEsq and what have not. Optionally, you can always select some items and perform synchronization manually.
- We will use Contacts as an example; the same instructions will work for Calendar and Email.
- Select Contacts, from Outlook menu, select View => Current View => Phone List, you should see a list of all your contacts. Right Click on the List Title row, and choose “Customize Current View”, and then
- Click on the Fields button an, scroll to the bottom to select “User Defined Fields”, and then add select (and then click on the Add button) the Sync and HoudiniContactGUID fields.
- Sync is the synchronization flag between Outlook and HoudiniEsq. If the flag is checked, then it’s been synchronized. If the flag is missing or not checked, then it has not been synchronized. You can select it and click “Upload Contacts” button on the Houdini ESQ toolbar to do a manual synchronization.
- HoudiniContactGUID is the unique identifier in HoudiniEsq server for every contact. This is useful information for trouble shooting when needed.
Note – If you uninstall and re-install HoudiniEsq, the database will change due to a re-installation and HoudiniContactGUID in Outlook add-in will no longer be valid. In this special situation, you should export all your contacts to a CSV file, delete them in Outlook, and then import Contacts back to get rid of the old HoudiniContcatGUID. Only then you can have a successful synchronization with your re-installation of HoudiniEsq.
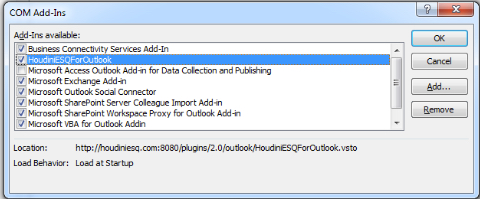
Disable the Outlook Plugin
- Select Tools Menu, and then select “Trust Center …”, on the left Pane.
- Select Add-Ins, you should see “HoudiniESQForOutlook” in the list of Add-ins.
- Click the “Go” button at the bottom, you should see a list of “COM Add-Ins”. Uncheck HoudiniEsq and click “OK”.
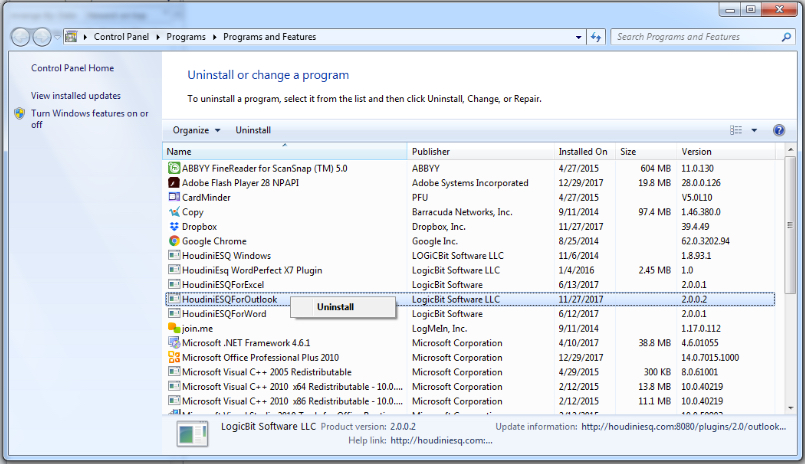
Uninstall the Outlook Plugin
To remove HoudiniEsq add-in from your computer, you should go to Control Panel=> Uninstall Programs, and select “HoudiniESQForOutlook” to uninstall.