Welcome to an overview of the HoudiniEsq Microsoft Word plugin. This plugin can be deployed for Office 2007/2010 (Windows) or Office 365/2019 (Windows and OSX). We will include instructions for both sets of add-ins.
Microsoft Office 2007/2010 (Windows Only)
- Download the Plugin
- Install and Setup the Plugin
- Using the Plugin
- Opening Documents
- Saving Documents
- Managing Word Templates
- Generating Documents
- Uninstall the Plugin
Office 365/2019 (Windows and OSX)
- Install and Setup the Plugin
- Using the Plugin
- Opening Documents
- Saving Documents
- Generating Documents
- Uninstall the Plugin
Microsoft Office 2007/2010 (Windows Only)
Download the Plugin
You can download and install the HoudiniEsq for Word plug-in using this link:
Install and Setup the Plugin
- Make sure you have Word 2007, 2010, or 2013.
- Make sure Microsoft Word is closed.
- Unzip HoudiniESQForWord.zip file, and then double click Setup.exe to start installation.
- Installation should only take seconds.
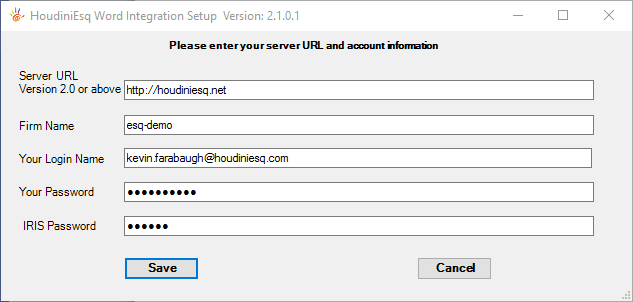
HoudiniESQ Add-in Setup
- Start Microsoft Word, you should see this window pop up for HoudiniESQ setup information. If you have the Outlook plug-in installed already, you may not see this screen.
- You must specify your HoudiniEsq server URL (see example above), your username, your password and your IRIS password. Ensure that you are entering the entire URL, including the port number if applicable. You will get a confirmation message if setup is successful.
- Setup is required only once and you should never have to do it again.
- IMPORTANT NOTE: If you are using HoudiniEsq SaaS, you will connect to the following URL: http://houdiniesq.net/ then enter your firm name in the field as shown above..
Using the Plugin
You will see HoudiniEsq as a option in the MS Word tab (pic is from Office 2010).
Here is a breakdown of the options available.
First, click the Open option to open a file from HoudiniEsq.
Opening Documents
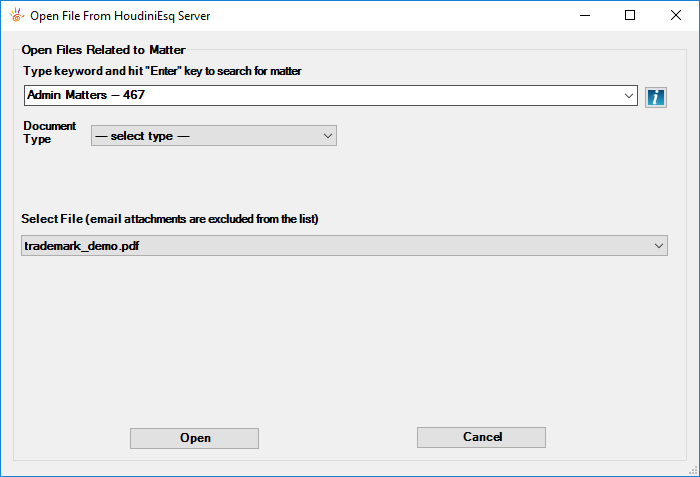
- To open a file from HoudiniEsq server, you need to start typing a matter reference and hit “Enter” key to search; the system will return matters that match the searching criteria. After you select a matter from the list, the file drop down list will be enabled with a list of files for the selected matter. Select a file and click Open.
Note – you should only open Microsoft Word files. Other file types may or may not be supported.
Saving Documents
To save a file to HoudiniEsq server, click Save from HoudiniEsq menu.
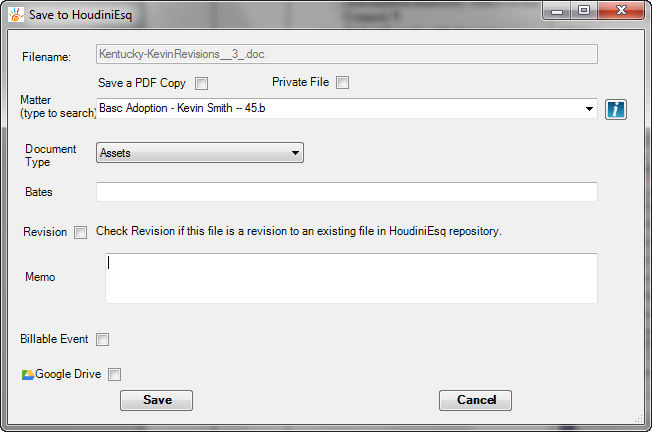
- If you initially opened the document with the HoudiniEsq plugin you will see this screen. This screen allows you to directly save to HoudiniEsq AND replace an existing document if this an edit.
- Document Type dropdown is the list of document types available in your system. It will be automatically filled in if the document has a type associated with it. You can create document types in the Setting. Document Subtype dropdown will automatically appear if the selected document type has subtypes defined.
- Matter field will be filled in automatically if the file is already linked to a matter in HoudiniEsq. Otherwise, please search for the matter that this file is related to.
- You can add text in the Memo field.
- Check “Save a PDF Copy” checkbox if you want the system to automatically save a PDF version of the document on the server.
- Check “Private File” checkbox if this file is private.
- Check “Billable Event” checkbox and select a task name and the time you spent if this is a billable event. The system automatically creates a time entry for you.
- If you have Google Drive sync setup you can sync this document there as well.
Click Save to save the file. You will get confirmation if it is saved successfully.
Managing Word Templates (only available if you have Word Template access)
Note: You can find more information about document templates and how to manage them, including how to create them without the use of Microsoft Word, via this article: http://help.houdiniesq.com/knowledge-base/document-templates/
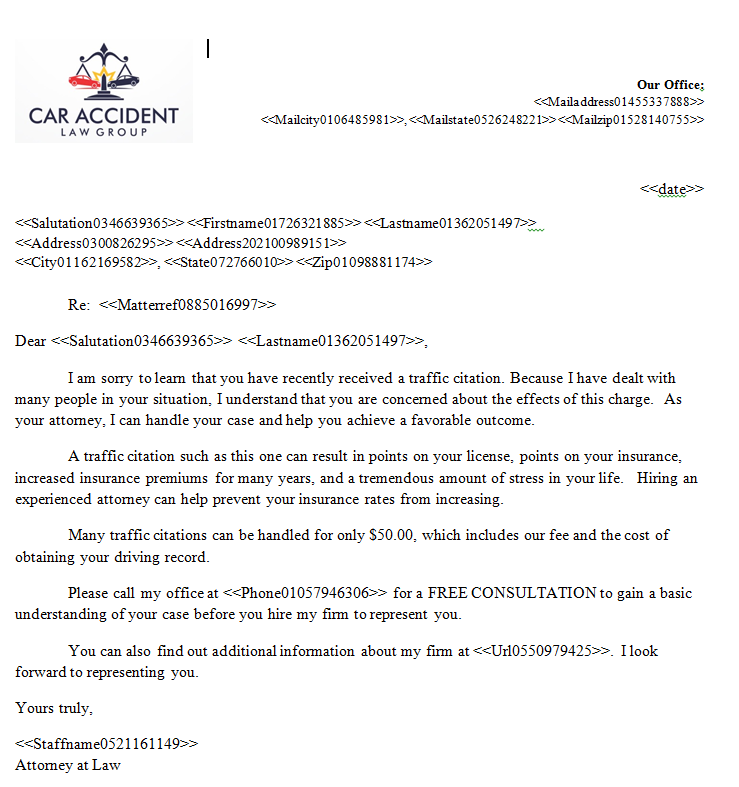
If you have access to Word Template feature, you will see the “Manage Template” menu. Templates allow you to insert ‘tokens’ into a Word doc. A token is a placeholder for a particular value. Example ‘Client-first-name’. The Word document allows you to place these token into your document so that these values will automatically be placed in there.
- To create a template start with either a blank Word document or open an already existing template.
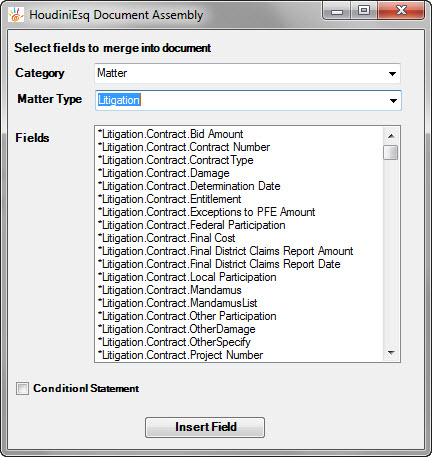
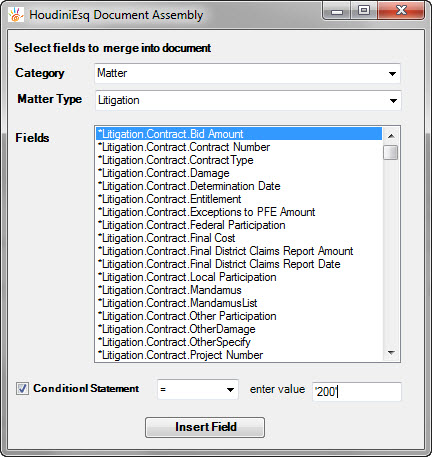
- Click Insert Field to add tokens.
- You can drilldown to specific field associated with matters, events, contacts, staff, and more. This includes custom field data too.
- Additionally, you can also add a Conditional Statement by selecting the field, checking “Conditional Statement” and then selecting your data comparitor, and the result you are comparing. Then click “Insert Field”.
Then, simply input the text you wish to display between the <<cs>> and <<es>> tags that are created. If the condition is matched, the text will be shown.
- A document template will look something like this.
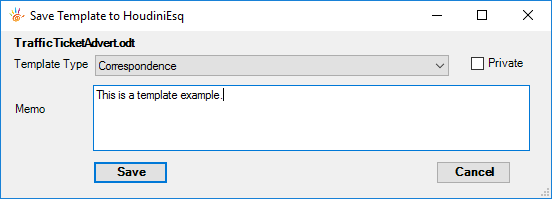
When finished, click Save Template to save the template to HoudiniEsq. Select your Document Type and enter a Memo, then click Save. It is not recommended to make templates Private as other Staff will not be able to access them, but the option is available.
Generate Document
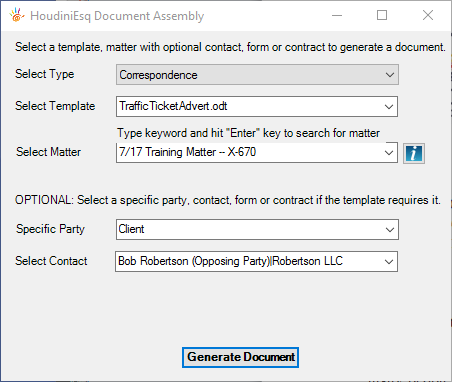
To generate a document for a particular matter using matter specific data from a template, click “Generate Document” button.
Select a template from the “Select Template” dropdown, enter and search for a matter in the “Select Matter” dropdown. Click “Generate Document” to generate a matter specific document. If you have lots of templates in the system, you can filter your templates by selecting a template type in the “Select Type” dropdown.
Once this generates all tokens will be replaced with actual data from matter (and contact). This insurance document will look like this when it is generated with actual data.
Uninstall the Plugin
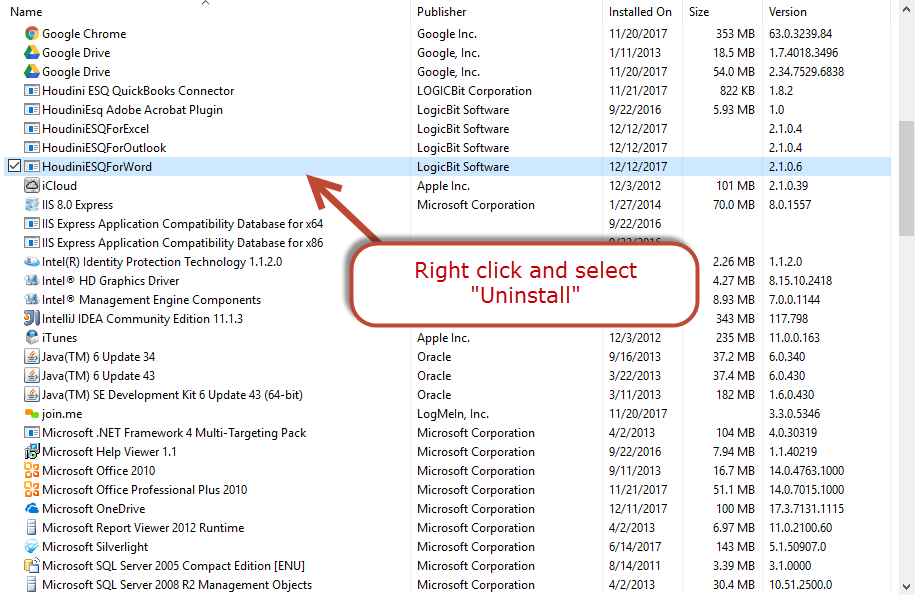
If you want to uninstall the add-in, you need to exit Word, and then enter Windows Control Panel -> Programs -> Uninstall a program, and click HoudiniESQForWord to uninstall.
Office 365/2019 (Windows and OSX)
Install and Setup the Plugin
- Make sure you have Word 2019 or are using Word through Office 365 online.
- Open a new document and then go to the Insert tab, then select Add-ins.
- Search for the HoudiniEsq add-in as shown below. Click “Add”.
- The add-in will then appear in your Home tab.
HoudiniESQ Add-in Setup
- When you select the HoudiniEsq add-in from the Home menu, you will see a screen asking for your login information. You must specify your HoudiniEsq Cloud firm name (see example above), your username, and your password. You will get a confirmation message if setup is successful.
- Setup is required only once and you should never have to do it again. If you need to modify your login information you can do so in the “Settings” tab of the add-in.
- IMPORTANT NOTE: Only HoudiniEsq Cloud is currently supported with the Microsoft Word 2019/365 version currently. If you are using HoudiniEsq On-Premise you will need to use the Windows-only add-in for 2010 and above.
Using the Plugin
The HoudiniEsq Office 365 Plugin has several tabs at the top:
- Settings: This is where you can go to change your login information and cloud server settings as described in the HoudiniEsq Add-In Setup section we just mentioned.
- Document: This tab will allow you will allow you to either Open or Upload a file.
- Template: This tab allows you to either Open an existing HoudiniEsq document template, or Insert Fields from HoudiniEsq in order to create a new template.
- Uploading templates is currently not supported by the Office 365 add-in, however any templates created with the Insert Field function can be uploaded manually through the web interface. For more information on how, consult this article.
- Merge: This tab will allow you to merge Matter information from an existing HoudiniEsq document template into a finished document.
- Timer: This tab will allow you to start and stop a timer in order to track your progress while working on documents using the add-in.
Opening Documents
To open a file from HoudiniEsq, select the Document tab from HoudiniEsq menu and then select the Open option. Next, follow these steps:
- Begin typing a matter reference in the Matter field. Once you stop typing, the system will return matters that match the searching criteria.
- After you select a matter from the list, the file drop down list will be enabled allowing you to select a Document Type.
- Once a Type has been specified, the File field will appear with a list of files for the selected matter. Select a file and click Open.
Note – you should only open Microsoft Word files. Other file types may or may not be supported.
Saving Documents
To save a file to HoudiniEsq server, select the Document tab and then select the Save option from HoudiniEsq menu. You will have a number of options:
- File Name will allow you to specify the name for the file in HoudiniEsq. This field is required.
- Check “Private File” checkbox if this file is private. This means that no other users will be able to access this file except you.
- Matter field will be filled in automatically if the file is already linked to a matter in HoudiniEsq. Otherwise, please search for the matter that this file is related to.
- Document Type dropdown is the list of document types available in your system. It will be automatically filled in if the document has a type associated with it. You can create document types in the Setting. The Document Subtype dropdown will automatically appear if the selected document type has subtypes defined.
- You can add text in the Bates field to specify a Bates number if applicable.
- The Memo field will allow you to add any additional information about the document you feel is relevant, such as revision notes or instructions for other users.
- Check the “Billable Event” checkbox and select a task name and the time you spent if this is a billable event. The system will automatically create a time entry for you.
- If you have Google Drive sync setup you can sync this document there as well using the checkbox.
Click Save to save the file. You will receive a confirmation if it is saved successfully.

