Two of the most important aspects of running your firm or organization is accounting for time spent, both in terms of billable and non-billable items, and keeping track of your upcoming appointments. While most legal practice management applications require you to record and manage these important aspects separately, HoudiniEsq uses Events to combine these critical elements into one easy to manage area.
Events can allow you to record your time, mark it as billable and determine the appropriate rate or amount, and simply schedule an upcoming meeting or court date. You can set up automatic repeating Events, allow other Staff to view the Event as part of their calendar, or even add Alerts which will notify you when the Event is about to take place or has expired. Time can be scheduled and billed with just a few clicks of the mouse.
The Event Record
In this article, we’re going to talk about the Event record in details, including the various fields, billable options, and concepts such as Alerts and Attendees. Events can be accessed either from the Calendar tab of the Matter Dashboard, the Calendar, or the Activity Page. They can be added from any of these areas as well.
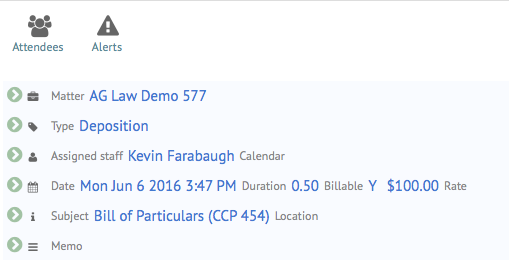
The Event record is comprised of multiple areas. Each area can be expanded to view the fields present in each area by clicking the green arrow icon to the left of the text. Clicking it again will hide that area. Additionally, there are two areas which can be toggled on or off at the top of the Event form to show the currently assigned Attendees and Alerts for the Event.
The Matter section will display which Matter the Event is currently associated with. While an Event does not have to be linked to a Matter, it is recommended to do so in order to allow Staff to more easily locate the Event through the Matter Dashboard or through filtering options. Additionally, an Event must be linked to a Matter to be billed.
To link the Event to a Matter, simply type part of the Matter name, press Enter and select the appropriate Matter. To unlink the Event, click the X next to the Link to Matter field.
The Type section will display the current classification for this Event. The Event Type is a general description for what is taking place, and can be used for filtering and reporting options later on. Simply select or search for an available classification from the Type dropdown, or alternate add your own by typing in a value and pressing Enter.
Additionally, each Type can have a Subtype and Status Code assigned, and each Event can have a color assignment to distinguish it in the Calendar. These works in a similar manner to the Type field. To add a color, simple click the Color box and select the desired color from the palette.
The Staff section will allow you to assign this Event to a specific Staff member for billing and timekeeping purposes, and also allow you to link the Event to a specific Matter key date and calendar. Simply select an option from these dropdown to set these values. The Calendar dropdown will also allow you to create a new Calendar to add the Event to by typing in a name and pressing Enter, then confirming the addition.
The Date section allows for you to specify the date and time of the Event, along with the duration. This duration is used, along with the Bill Rate, when the Bill checkbox is clicked to assign an Amount to this particular Event. The Amount is what will be charged for this particular Event, and will be reflected in the Pre-Bill section of Invoicing.
The Bill Rate used to calculate the Amount is typically the same one selected in the Matter which the Event is assigned to. However the Bill Rate can be changed to any particular Rate using the dropdown. Additionally, the Amount itself can be set to any value you wish manually. If you wish to recalculate the Amount, you can do so at any time by unchecking and then checking the Bill box.
The Subject can be viewed as a “short description” of what took place at this Event. This should be no more than 40 characters and be as brief as possible, as you will be able to provide more detail in the Memo section which we will talk about below. You can additionally specify a location for this Event as well.
The Memo field is used for a more in-depth description of what transpired at this Event. Both the Subject and Memo will be included in the invoice. The Memo can contain hundreds of characters and can be as detailed as you wish.
The additional sections of an Event can be accessed from the icons at the top. Clicking one will toggle the section on or off. First, we’ll talk about the Attendees section.
Attendees are users who can view the Event on their calendar view. They will also receive any Alerts assigned to the Event. You can add an Attendee with the + icon at the top right, and remove them with the minus icon (-) to the right of their name.
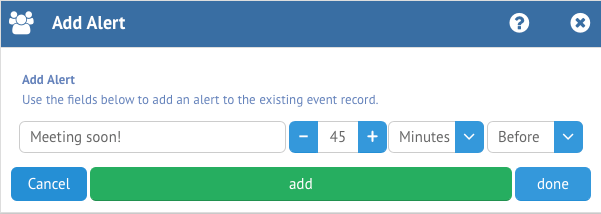
Alerts can be assigned to any Event from the Alerts panel. An Alert will notify you of an Event and allow you to view the record directly, regardless of what part of the system you are currently viewing. They are best used to inform you and all Staff designated as Attendees of upcoming important Events, To add an Alert, click the Add button to the top right (+).
Enter your Alert text in the first entry field, and then specify the number of units in the second box. Define those units with the third box (Minutes/Hours/Days) and then finally specify whether the Alert will display Before or After the Event in the final box. Once finished, click Add to create another Alert. You can continue to create Alerts as long as you wish, or until you click Done. Clicking Cancel will close the window without creating any Alerts.


