
The next part of the Customize Mode allows you to define Triggers. Triggers are a concept first explored in HoudiniEsq Classic, that allow you to extend the functionality of HoudiniEsq. Triggers allow you to automate certain actions in HoudiniEsq, such as sending notifications, filling in or tallying field values, sending email and generating documents, or creating new calendar Events, to name a few. They are further refined in HoudiniEsq 2.0 to be easier than ever to set up with a new visual interface, allowing you to quickly define and create them on the fly. To access Triggers in Customize Mode, select the field you wish to define a Trigger for, and click the Triggers tab at the top.
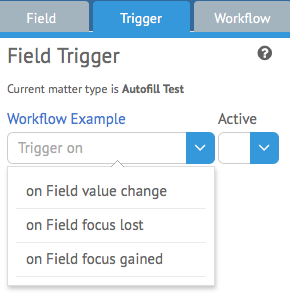
Triggers are defined not for a single record, but for an entire Record Type: the current type is shown at the top. The field you have selected in also displayed, and below that is the select box for when you want this Trigger to activate. The options are:
on Field value change: This trigger will activate when the value of this field is changed, and then deselected.
on Field focus lost: This trigger will activate when this field is selected, and then another field is selected after.
on Field focus gained: This trigger will activate as soon as the field is selected.
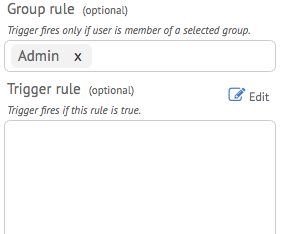
Additionally, you can define Rules for when this Trigger will fire. Rules can be set so the Trigger activates only when a specific Staff Group takes action (such as Admin) in this example or when a certain Condition is met. These options can be set at the bottom of the form. Click the Trigger rule box to set a rule for this trigger.
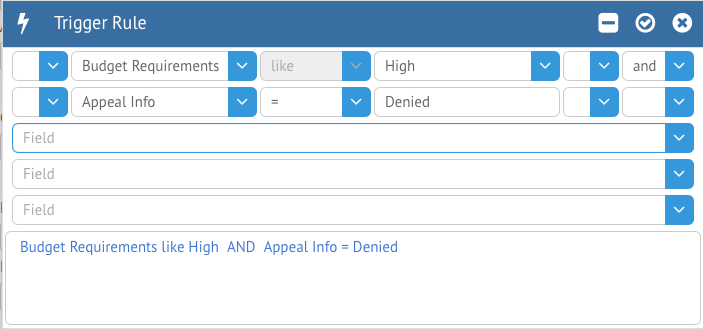
You can set up to 5 Rules in the Trigger Rule interface, which can be based off any current field. The middle box functions as the Comparator, which describes how this field will relate to the Value entered in the next box. For example, “like” will look for a value similar to the one entered (but not exact), while equal (=) will look for an exact match.
The possible Trigger Actions can be set in the middle of the Trigger tab. Active Trigger Actions will display in Blue, while inactive Trigger Actions will display in a pink color.
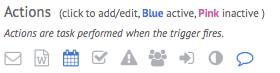
We will be covering Trigger Actions in a separate article. Here, we will describe them briefly from left to right, in order:
Send Email – This trigger action will allow you to send an email template to one or more Staff or Related Parties.
Generate Document – This trigger action will allow you to generate documents from templates, and optionally send them to one or more Staff or Related Parties.
Create Event – This trigger action will allow you to create an Event record and add one or more Staff as attendees.
Create Todo – This trigger action will allow you to create a Todo record and assign it to one or more Staff.
Create Notice – This trigger action will allow you to create a Notice record and assign it to one or more Staff.
Assign Group to Record – This trigger action will allow you to assign the current Matter to a Staff Group.
Assign Field – This trigger action will allow you to automatically assign values to fields on the record as well as create tally (auto-calculation) fields.
Show/Hide Field Group – This trigger action will allow you to show or hide certain groups of fields when the trigger is activated.
Show Popup – This trigger action will show a pop up message when activated.